

Post by Mark Hockings (GamePlan) on Jun 12, 2012 23:35:52 GMT
It's one of the early maps but also one of the trickiest, due to the fact you start so close to the opponent.
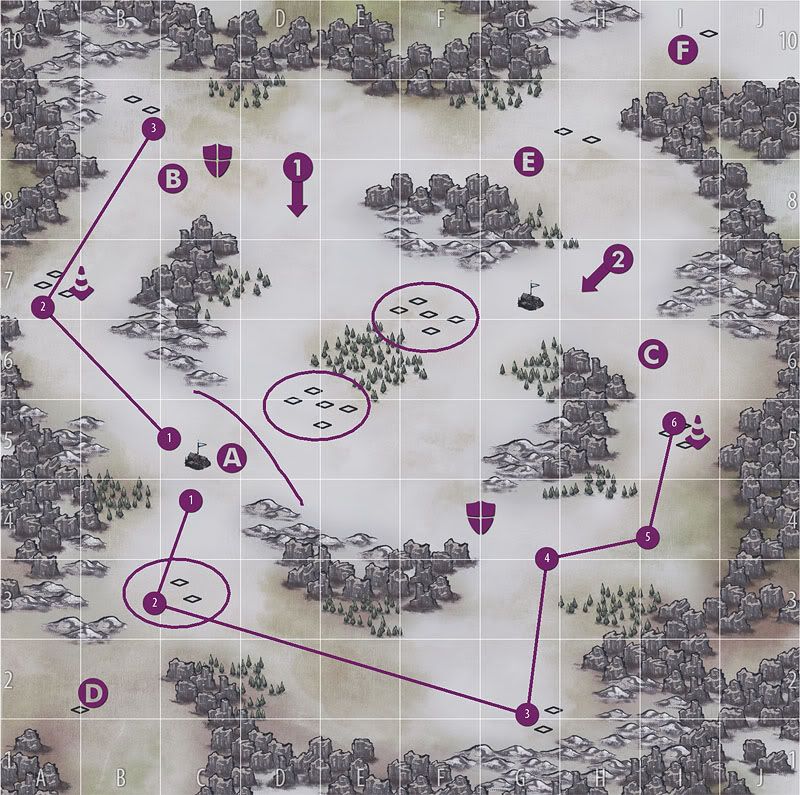
This strategy involves relocating base and flanking, and is designed from the perspective of starting at (A), but the same principal will work from the other starting point as the map is fairly symmetrical.
Don't be tempted to move towards the central forest just yet. Produce 1 horse (first) then an archer then another horse.
Send the horse to the south waypoint path and build up some farms and camps as you go.
Move your archer onto the mountains in D4 ready to protect (with longer line-of-sight from the hills)
Send the other horse up the west side to create a base at spot 2 and 3, then wait at B. A key thing will be to slowly reinforce the shield areas by B to stop the enemy creeping around the sides like you re trying to do.
When you can build more units, go for another horse and quickly claim spot D then use his speed to catch up with your reinforcements wherever you need (A, B, C or either shield). Depending how the game went so far, you will need to decide which side is more appropriate to build a reinforcement fort... potentially, if you can get around to (E), that would be a good place to put a surprise fort.
Now, depending if you have control of areas B or C (or both) you can decide to push in from entry point 1 or 2 to harass and attack any camps and farms to reduce the enemies infrastructure.
In a real world situation it hardly works out exactly like this so you need to stay flexible... but this is a step beyond slogging it out in the middle
I'd love yo hear your comments if anyone has a good way for this map!
This strategy involves relocating base and flanking, and is designed from the perspective of starting at (A), but the same principal will work from the other starting point as the map is fairly symmetrical.
Don't be tempted to move towards the central forest just yet. Produce 1 horse (first) then an archer then another horse.
Send the horse to the south waypoint path and build up some farms and camps as you go.
Move your archer onto the mountains in D4 ready to protect (with longer line-of-sight from the hills)
Send the other horse up the west side to create a base at spot 2 and 3, then wait at B. A key thing will be to slowly reinforce the shield areas by B to stop the enemy creeping around the sides like you re trying to do.
When you can build more units, go for another horse and quickly claim spot D then use his speed to catch up with your reinforcements wherever you need (A, B, C or either shield). Depending how the game went so far, you will need to decide which side is more appropriate to build a reinforcement fort... potentially, if you can get around to (E), that would be a good place to put a surprise fort.
Now, depending if you have control of areas B or C (or both) you can decide to push in from entry point 1 or 2 to harass and attack any camps and farms to reduce the enemies infrastructure.
In a real world situation it hardly works out exactly like this so you need to stay flexible... but this is a step beyond slogging it out in the middle

I'd love yo hear your comments if anyone has a good way for this map!