

Post by Mark Hockings (GamePlan) on Jun 21, 2012 8:42:42 GMT
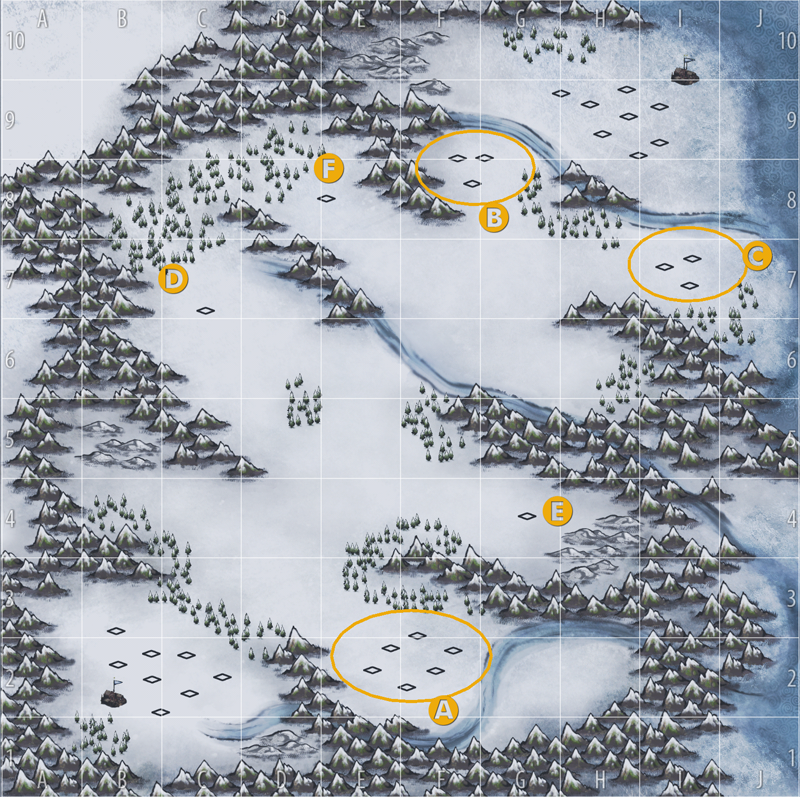
This is a guide for a rush approach to the Mist Lagoon map on the fantastic iPad game, Autumn Dynasty.
This is in my opinion the hardest map in skirmish mode. There are so few resources and such little land space that clashing is almost instantaneous and can be very damaging in a short space of time, because all the base buildings are so close to each other.
This is by no means a perfect strategy, comments welcomed!
The only semi-reliable way I have found of not getting totally overwhelmed is to KEEP harassing the enemy... NEVER let them build or go for too long without you interrupting them.
Assuming we are starting at the south base, set your fort rally point to just this side of the river (in between the trees). Upgrade the economy research to stage 2 before other research.
Create 1 pikemen first and let them travel to the rally point. Build 1 cavalry next and 1 archer. Get them to build 1 camp and 2 farms then get them to go to the rally point by the river to link up with the pikemen. Hide archers in the trees nearest the river but be reasy to retreat if the enemy has fire ability!
Build another archer for your 4th unit and with them build more camps and farms. Once you have filled all slots in your own base, move 1 unit to area A to build more there.
Try to keep 'walls' of units between your rally point and your base - dont send them ALL to the front, this way if you need to retreat some frontline units and get chased, the fresh units will hold them up allowing your fatigued ones to get safely back to fort to heal. Keeping your units alive longer than the opponent can and usually will swing this match.
IMO points D, E and F are not worth touching until you have an already strong position.
The key is to have enough cash coming in to keep feeding units to the rally point, and having
You will probably (definately) have skirmishes at the river choke point, so keep your archers at a distance where they can hit the enemy if they are going slow in the water. You need to use your units wisely to gain the advantage of attrition. This is one of the best maps to test your scissors/paper/stone relationship knowledge of the units!
You should have a good feel for if it's safe to push forwards to their side of the river (your units will be vulnerable whilst in the water) but as soon as you can get near their base (B and C), bring in a couple of catapults to 'open the door'.
Another thing that works well and can be more versatile and last longer than catapults is swordsmen with smoke ability (if you have any towers to deal with)... you can cause some serious damage to areas B and C.
Just keep on churning units out - try to to let your build queue run out, and keep units alive if you can...