

Post by Mark Hockings (GamePlan) on Jun 11, 2012 23:06:55 GMT
This is a quick guide to one approach to the Hsu's Bluff map in Autumn Dynasty.
The guide is written assuming we are starting at the bottom, but due to the fairly symmetrical nature it applies for the other position also.
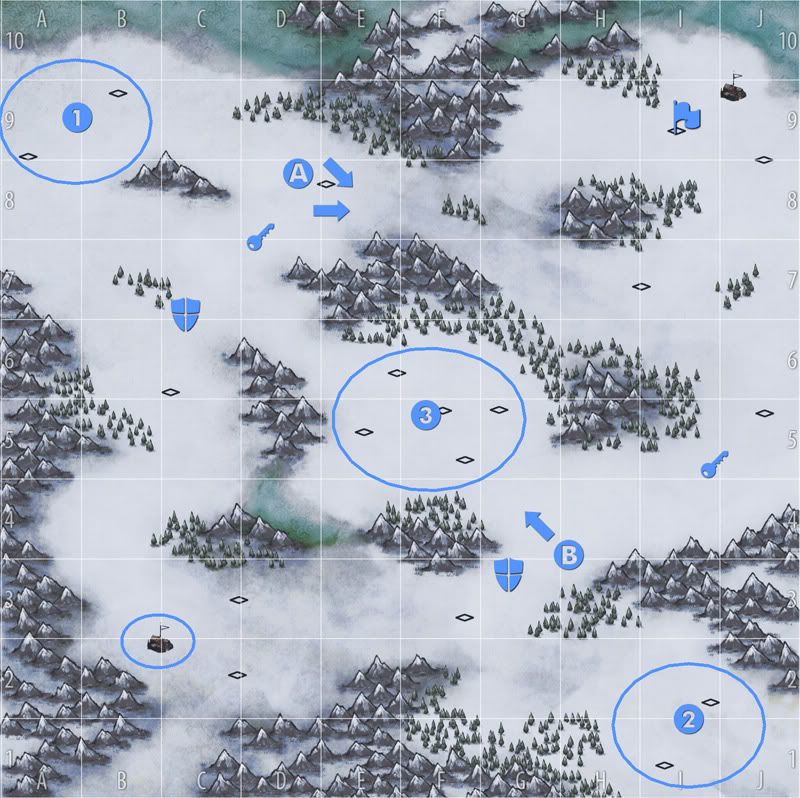
It's tempting to aim straight for the centre and fight it out for those spots, but the odds are higher that you will encounter the enemy if you head straight there. This strategy revolves around keeping the enemy guessing early on and trying to take over their initial base to damage their economy.
For this strategy, the key areas are denoted by the 'key' icons. If you can control (hopefully both) these you will be in a strong and flexible position to win the game. Don't worry about the centre for now!
Try splitting your forces and go around the outside to number 1 and/or 2 and build a camp and farm at each. This will increase your chances of having an interruption free setup because the enemy is more likely to go for the centre than both sides. Make your HQ rally point to one or other of the 'shield' icons (whichever the enemy is more likely to come towards). You need to KEEP a defence at these locations to stop the enemy from retaking you base as you push forwards to his, so move slowly and don;t overstretch yourself. Try NOT to build a tower at the defence choke points until later on to give you more money for the initial expansion to 1 and 2. They will likely just get destroyed by catapult until you have an expendable enough force to get near them, so keep mobile.
If you can establish a fairly strong position, it would suggest that the enemy has been using it's units to push forwards to the centre and harassing your defences, so if you can, try to push to the north east (via A) to take over their hopefully lightly defended base instead of getting into a big brawl in the centre early on.
Build another fort in the north east once you have destroyed their initial base (near the flag icon) then defend until you can build a force to outnumber and move in on the centre from all directions to complete the job. Route B is obviously the most direct route, but it may be worth risking going through the forest and certainly worth send a squad or two to come in from the opposite entry point.
Some general notes (applies to most maps!): It is dangerous to lay ambush or hide archers in forest in case of fire, so stay clear.
The biggest problem you can run into (as usual) is catapults. Always try to keep some cavalry within easy reach of the key areas to deal with them.
The guide is written assuming we are starting at the bottom, but due to the fairly symmetrical nature it applies for the other position also.
It's tempting to aim straight for the centre and fight it out for those spots, but the odds are higher that you will encounter the enemy if you head straight there. This strategy revolves around keeping the enemy guessing early on and trying to take over their initial base to damage their economy.
For this strategy, the key areas are denoted by the 'key' icons. If you can control (hopefully both) these you will be in a strong and flexible position to win the game. Don't worry about the centre for now!
Try splitting your forces and go around the outside to number 1 and/or 2 and build a camp and farm at each. This will increase your chances of having an interruption free setup because the enemy is more likely to go for the centre than both sides. Make your HQ rally point to one or other of the 'shield' icons (whichever the enemy is more likely to come towards). You need to KEEP a defence at these locations to stop the enemy from retaking you base as you push forwards to his, so move slowly and don;t overstretch yourself. Try NOT to build a tower at the defence choke points until later on to give you more money for the initial expansion to 1 and 2. They will likely just get destroyed by catapult until you have an expendable enough force to get near them, so keep mobile.
If you can establish a fairly strong position, it would suggest that the enemy has been using it's units to push forwards to the centre and harassing your defences, so if you can, try to push to the north east (via A) to take over their hopefully lightly defended base instead of getting into a big brawl in the centre early on.
Build another fort in the north east once you have destroyed their initial base (near the flag icon) then defend until you can build a force to outnumber and move in on the centre from all directions to complete the job. Route B is obviously the most direct route, but it may be worth risking going through the forest and certainly worth send a squad or two to come in from the opposite entry point.
Some general notes (applies to most maps!): It is dangerous to lay ambush or hide archers in forest in case of fire, so stay clear.
The biggest problem you can run into (as usual) is catapults. Always try to keep some cavalry within easy reach of the key areas to deal with them.
Attachments:
